eScape@IGP
Preparing a Wordprocessor File
It doesn't get better than the styling
Important Notice. This is not a general website. It is an advanced digital content production resource for publishers. You must use an HTML5/CSS3 standards compliant browser to get the full value of this website. This means you must use: Firefox 4+, Google Chrome 13+, Safari 5.2+, Opera 10+, Internet Explorer 10+.
Open the eScape Template
You must be using a genuine eScape Structure-Style DOT, or OTT template. If you haven't got one you can download it from here. Save it to a convenient work location, or install it as a template.
Depending on the book you are processing it will take more or less time to structure style a book. We are going to use the Project Gutenberg A Christmas Carol text file in this first simple example (download it here). Depending on you familiarity with Libre Office / Open Office , this will take around 30 minutes.
Text file Preparation
Note on Steps 8-14
If your file has correct paragraphing do not apply these steps.
Steps 8-14 only apply if your input text file is processed with each line as a paragraph (which is how Gutenberg text may open in your Wordprocessor). The steps that can be omitted are highlighted in blue.
- Download the text file and open it in your Wordprocessor (right click and select open with program). It will open as preformatted text with line breaks.
- Top and tail the Gutenberg project information. That means remove all text from the start of the file to the line- *** START OF THIS PROJECT....; and towards the end of the file, from the line - End of the Project Gutenberg.....
- You will be left with just the book text in a line by line presentation.
- Also you don't want the internal Contents Page, so you can delete this too.
- Select the entire text with Ctl-A. All selected text will have black background.
- Apply the global style Default. You text will change to the default style which is usually a serif font.
- Click to clear the select all and position the cursor at the start of the file (first character, first line, it doesn't matter if it is blank).
- We are now going to use a find and Replace regular expression to join the paragraphs together.
- Click Edit-Find & Replace. This will open a dialog.
- Click more options to expand the dialog and check Regular Expressions.
- Enter a $ in the Search for text box.
- Click in the Replace with text box and carefully enter one (1) space.
- Click Replace all. The file will be processed and give a message Search Key replaced 3,119 (or something close to that, yours may be a few more or less). Inspect a few paragraphs to make sure you applied the regular expression correctly.
- You can use Ctrl-Z to undo the entire process if you want to try again.
- You now have a text file in which all paragraphs are correct, and all text is set to the Default style. That should have taken about five minutes.
- You don't have to save this if you are going to the next step immediately. If you do save it use something descriptive such as Christmas_Carol_Manuscript.odt.
Creating the eScape ODT
Find the eScape-book-template.ott file. Double click to open a new document with the template included.
Save the file with a suitable name. I am using Christmas_Carol_styled.odt.
Switch to your Christmas Carol manuscript file and select all using Ctrl-A. Then copy it to the clipboard using Ctrl-C.
Switch back to the template document. Page down and select the text "Start your content here..."
Paste the manuscript text into the template document. It's probably a good idea to save the document at this stage.
Metadata First
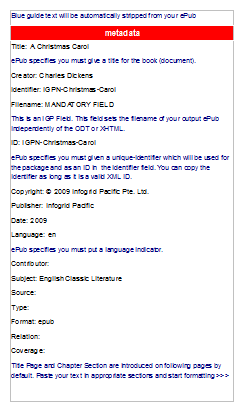
Your Open Office Metadata page should look something like this after editing
You can create an ePub right now, but only if your metadata is correct. So lets do that first.
The ePub spec says you have to have the Title, Unique-Identifier and language statements, so lets fill in the required fields. You must fill in the following as minimum.
Title: A Christmas Carol
Creator: Charles Dickens
Identifier: IGPN-Christmas-Carol
ID: IGPN-Christmas-Carol
Language: en
Filename: Dickens-A_Christmas_Carol
Use Ctrl-S and save your ODT.
Book Structure-Styling
OK. Now down to work. We selected this book because it has only five chapters (Staves), and internally only a single content block structure, so you should be able to get this made in no time at all.
- Back to the ODT. Open the Styles & Formatting toolbar (SAF-toolbar) by clicking on the icon or just hit F-11.
- Set the SAF-toolbar to paragraph styles, and select Custom Styles. We will be using these the most.
Styling the Title Page
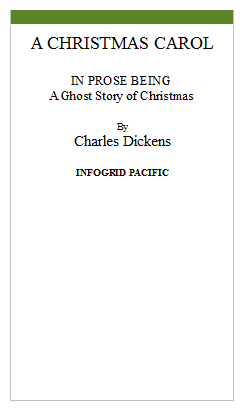
Your Open Office Title Page should look like this after the styles are applied
- Go to the template Title Page. This is the first page with a green line across the top, immediately after the metadata. It also has book title placeholder text.
- Edit the Book Title text to read "A Christmas Carol".
- Hit enter, to create an empty Default paragraph.
- On the new line type "by". Leave the cursor on the line.
- From the SAF-toolbar - Custom Styles, down at the bottom, locate title-other-igp. Double click the style to apply it to the paragraph. The text will change size and center align.
- Hit Enter again, to create an empty Default paragraph.
- On the new line type "Charles Dickens". Leave the cursor on the line.
- From the SAF-toolbar - Custom Styles, down at the bottom, locate title-aut-igp. Double click the style to apply it to the paragraph. The text will change size and center align.
- If you want to promote yourself as a bit of a publisher. Repeat this action once more.
- Hit enter again to create an empty Default paragraph.
- Type in your publisher moniker. We obviously use INFOGRID PACIFIC.
- From the SAF-toolbar - Custom Styles, down at the bottom, locate title-pub-igp. Double click the style to apply it to the paragraph. The text will change size and center align.
- Congratulations. You have now Structure-Styled your Book Title Page.
- Use Ctrl-S to save your work in progress. If you want, you can again export the XHTML. If eScape is still open and pointing tothe XHTML file, you only need to click eScape to ePub, to instantly regenerate your ePub.
Styling a Chapter Page
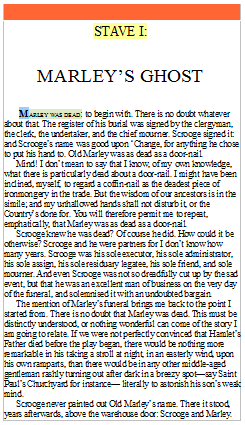
The Open Office Chapter Opener page should look something like this when you have finished.
- Find the first Chapter Number and title in the book. Use find: Stave.
- Create an empty paragraph just above it and apply eScape custom style body-Chapter-igp.
- The line will turn orange. You don't have to put any text in this, but in a long book you can put some editorial statement in here if you want. Any text in the section break instruction will be stripped out.
- Next Turn the chapter number and chapter title into two separate paragraphs.
- Put your cursor in the chapter number paragraph (STAVE I:), then click the eScape custom style title-num-igp. It should immediately align to the center of the page.
- We are going to use the chapter numbering style in the book. That means we are not going to use auto number generation. To tell the eScape processor what do do here, we have to give one more style to indicate the number label.
- Select the text inside the title-number, including the roman number. IE. STAVE I. Switch to Character Styles. Double click title-num-label-igp. This will change the colour to pale yellow so you can see the Structure-Style has been applied. You can learn more about section numbering in a separate tutorial topic.
- Put your cursor in the chapter title paragraph, then apply Open Office style Heading 1. You can access this from the Format Selector if you have the Formatting Toolbar visible which is the easiest way.
TIP. Always remember that the style Heading 1, and its corresponding HTML style <h1> are strictly reserved for book and section titles. Do not use them for any other purpose or your TOC or other content structures will process incorrectly.
- You can style your opening paragraph. in this case we have applied a Drop Capital to the first character, and SmallCaps to the first dramatic phrase. Note that we included the exclaimation mark. This is to stop ugly gaps between words and closing punctuation from occuring when justification is applied.
- Select the first character. Switch the Styles toolbar to Character Styles. Double click on the eScape custom style char-dropcap-igp.
- Select the remainder of the phrase to which you want to apply Small Caps. From the Character Styles, double-click on the eScape custom style char-smallcaps-igp. The style will immediately change to small caps.
WARNING. If you are using Adobe Digital Editions (ADE) you will not see the Small Caps applies as this reader does not support CSS style font-variant: smallcaps; . If you want to use ADE, and you want Small Caps you will have to synthesis the style using text-transform: uppercase; font-size: 70%; or something similar.
You have now finished your first chapter opener styling job. Just repeat for the remainder of the chapters.