eScape@IGP
The Word Processor Templates
For Open Office, Libre Office and Microsoft Word
Important Notice. This is not a general website. It is an advanced digital content production resource for publishers. You must use an HTML5/CSS3 standards compliant browser to get the full value of this website. This means you must use: Firefox 4+, Google Chrome 13+, Safari 5.2+, Opera 10+, Internet Explorer 10+.
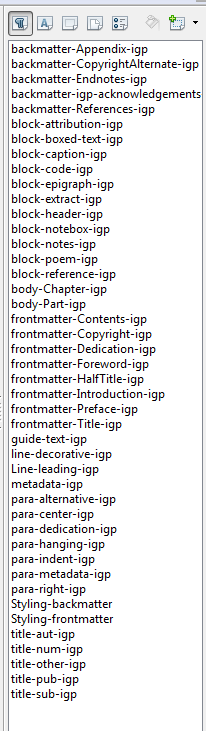
The eScape custom paragraph styles shown in the Open Office style toolbar
The Template File
The default template filenames are:
igp-eScape-book-template-Rev14.ott (Libre Office, Open Office)
igp-eScape-book-template-Rev14.dot (MS Word)
The revision number may change as new features are added.
The Template Paragraph Styles
The Libre Office Styles and Formatting Toolbar image shows the complete set of custom paragraph styles used to Structure-Style an ODT ready for eScape processing to an ePub. These are all easily viewed by selecting Custom Styles from the Styles and Formatting toobar. The same styles will be available in your MS Word Style window, but it is not as clearly and professionally presented as in the Libre Office interface.
Style Organization
Available styles are grouped as follows: Metadata, Book Structure, Content Blocks, Image Blocks, Tables, Lines, Paragraphs, Characters and Notes. The styles are presented as styleclass-structure.
DO NOT change the style names as the processor is sensitive about this.
Metadata Styles
Metadata. This defines that all paragraphs are metadata until the next book structure style. The processor extracts all the metadata paragraphs to create the ePub OPF metadata file.
para-metadata. Each metadata field is a paragraph with this style applied. The processor reads the metadata descriptor text up to the colon at the beginning of the paragraph. These values must not be changed from what is in the template.
Book Structure styles
These are subdivided into three classes: frontmatter (green), body (maroon/orange) and backmatter (blue). Book structure styles are placed on empty paragraphs, to instruct the processor on the construction of the book.
These are probably the most important styles and are actually processing instructions, rather than styles. After running, the processor radically changes the content. For example the chapter section style FoundationXHTML after processing looks something like this:
<div class="body Chapter" id="bookid-sec-chap-001">
  <div class="title-block">
      <p class="title-num">Chapter One</p>
      <h1>Chapter Title</h1>
  </div>
  <p>page content....</p>
  <!-- Rest of chapter content continues -->
</div>
So that takes a little bit of processing and reorganizing of the basic WP text. It is important that these styles are present if you want your ePub nicely broken into separate files.
In the default template the section markers are brightly coloured. You can change these styles anyway you like including no colour. It's your choice. The important thing is the style name, not the Word Processor attributes applied.
frontmatter-HalfTitle
Creates the Half title page as a separate file, and allows the title text inside to be styled independently from other text using the CSS selector: .HalfTitle h1 { }
frontmatter-Title
Creates theTitle page as a separate file, and allows the title text inside to be styled independently from other text using the CSS selector. Eg: .Title h1 { ... }
frontmatter-Copyright
Creates the Copyrightpage as a separate file, and allows the paragraph text inside to be styled independently form other text using the CSS: selector: .Copyright p { }
frontmatter-Dedication
Creates the Dedication page as a separate file, and allows the paragraph text inside to be styled independently from other text using the CSS: selector: .Dedication p { }
frontmatter-Epigraph
Create an Epigraph page as a separate file, and allows the paragraph text inside to be styled independently from other text using the CSS: selector: .Epigraph p { }frontmatter-Contents
Creates the Content page as a separate file, and allows the content inside to be styled independently from the book using the CSS: selector: .TOC ul { } and other styles
frontmatter-Foreword-igp
Creates the Foreword page as a separate file, and allows the title and paragraph text inside to be styled independently from other text using the CSS selector: .Foreword { }
frontmatter-Preface-igp
Creates the Preface page as a separate file, and allows the title text inside to be styled independently from other text using the CSS selector: .frontmatter .Preface h1 { }
frontmatter-Introduction
Creates theIntroduction page as a separate file, and allows the title and paragraph text inside to be styled independently from other text using the CSS selector: .Introduction { }
body-Part
Creates a Part page as a separate file, and is also a nesting indicator for chapters when generating the table of content structures. It also allows the title and paragraph text inside to be styled independently from other text using the CSS selector: .Part { }
body-Unit
Creates a Unit page as a separate file, and is also a nesting indicator primarily for Lessons when generating the table of content structures. It also allows the title and paragraph text inside to be styled independently from other text using the CSS selector: .Unit { }
body-Chapter
Creates a Chapter page as a separate file. It also allows the title and paragraph text inside to be styled independently from other text using the CSS selector:.Chapter { }
body-Topic
Creates a Topic page as a separate file. It also allows the title and paragraph text inside to be styled independently from other text using the CSS selector:.Chapter { }
body-Lesson
Creates a Lesson page as a separate file. It also allows the title and paragraph text inside to be styled independently from other text using the CSS selector: .Lesson { }
backmatter-Appendix
Creates an Appendix page as a separate file. It also allows the title and paragraph text inside to be styled independently from other text using the CSS selector:.Appendix { }
backmatter-References
Creates a Reference page as a separate file. It also allows the title and paragraph text inside to be styled independently from other text using the CSS selector:.References { }
backmatter-Endnotes
Creates an Endnote page as a separate file. It also allows the title and paragraph text inside to be styled independently from other text using the CSS selector:.Endnotes { }
backmatter-CopyrightAlternate
Creates a Copyright page in the backmatter as a separate file. This is there for those who like their e-book copyright page in the backmatter rather than the frontmatter. It also allows the title and paragraph text inside to be styled independently from other text using the CSS selector:.Chapter { }
Content Block Styles
Content Block styles are WP paragraphs that are styled as members of a block. After processing the paragraphs are incorporated into a single XML structure. For example, three sequential paragraphs with the style block-extract applied, and a last paragraph with block-attribution applied will make the following IGP:FoundationXHML:
<div class="block-rw extract-rw" id="generated-unique-id">
   <p> ...paragraph content... </p>
   <p> ...paragraph content... </p>
   <p> ...paragraph content... </p>
   <p class="attribution-rw"> ...Attribution text... </p>
</div>
**********
This is an efficient minimum text model. It becomes a very clean target for CSS styling, plus it is an XML target ready for other XML processes.
block-attribution
This is generally used as the last paragraph of a sequence of epigraph or extract paragraphs. It allows the processor to include the attribution line into a block, and allows the paragraph text to be styled independently, even on a block by block basis using various multi-CSS selectors. Eg: .block .Attribution { } .block .epigraph {}, etc.
block-boxed-text
Apply this to a sequence of paragraphs you want to be displayed as boxed-text. You can optionally put block-header as the first line, and block-attribution as the last line and these styles will be incorporated into the boxed text block.
block-caption
This is generally used as the last paragraph of a sequence of epigraph or extract paragraphs. It allows the processor to include the attribution line into a block, and allows the paragraph text to be styled independently, even on a block by block basis using various multi-CSS selectors. Eg: .block .Attribution { } .block .epigraph {}, etc
block-code
Apply this to a sequence of paragraphs you want to be displayed as a code block. The XHTML <pre> element will be applied to the text and your nesting white space will be preserved. Only use spaces for nesting your code. Do not use tabs.
block-epigraph
Apply this to a sequence of paragraphs you want to be displayed as an epigraph. Generally this will be placed immediately after one of the title block paragraph styles. If it is placed there, it will be incorporated into the title block.
block-extract
Extracts are one of the most common types of blocks in general content collections. Apply this style to all the sequential paragraphs you wish to be in the extract block. Use block-attribution as the last line if you have an attribution.
block-header
This is a single paragraph style that can be used at the start, or inside any other block paragraph sequence. If it is the first paragraph in a block sequence it will be incorporated into the block. This applies to block-epigraph, block-boxed-text, block-extract and block-notebox.
block-notebox
A notebox is identical to the boxed-text model, except it has a coloured background rather than an outline. It is probably used more in textbooks than tradebooks. Follow the same rules as for extracts and boxed text.
block-notes
If you have numbered notes at the end of a chapter, or end of the book you can apply this style to the paragraphs to make a continuous note block. This version of eScape does not give you a method to link notes to their references in text at this time although internally the note paragraphs do have linkable ID's generated.
block-poem
You can make very nice looking poetry. Treat each line of the poem as a paragraph (don't use line-breaks). This includes blank lines between stanzas. Apply the block-poem style to each line of the poem, and line-leading to the stanza break lines. The eScape processor will create a poem block which is centered on your page based on the longest line in the poem.
Warning. ADE (Adobe Digital Editions) does not appear to handle the display: table CSS element correctly. In addition to displaying the core block structure, it doubles the content and presents the internal elements as a set of table rows. If you are targeting ADE as your ePub Reader you will probably not be able to use the block-poem style.
In addition ADE does not support centering content using the CSS recommended margin: 0 auto 0 auto; method. Therefore readers such as Calibre and AZARDI will display the blocks centered correctly, ADE will not.
We strongly recommend against designing ePub XHML structures and styles to compensate for any reader bugs or behaviour quirks. You will loose future value, as has happened with so many other e-book formats in the past.
block-reference
If your book has a reference section, apply this style to each of the reference paragraphs. The default styling is a slightly smaller font and a hanging paragraph applied through a reference block element to the contained paragraphs.
Line Styles
There are currently two line styles. The advantage in using these, rather than just an empty line is that it creates a block structure in the XML and allows the paragraph following to be not-indented automatically.
line-decorative
When applied to an empty paragraph this creates three lines. You have to place your required decorative characters into the middle line.
line-leading
When applied to a paragraph this will create a single blank line. You will have to insert at least two spaces into the empty paragraph or the processor will strip the paragraph out.
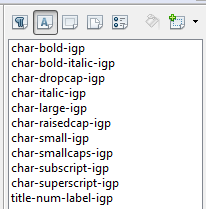
The eScape custom character styles shown in the Open Office style toolbar
Character Styles
There is a group of character styles which should be used to create special styling. Do not use the default ODT styling tools as they create a series of random style statements internally which may result in unpredictable output results (Example, your italic may become bold in the output).
All custom character styles are mutually exclusive. They cannot be applied on top of each other. Applying one will replace any underlying styles.
char-bold
Makes selected text bold. Use this style rather than the Open Office Writer bold button for consistent styling.
char-bold-italic
Makes selected text and italic bold. Use this style rather than the Open Office Writer bold and italic buttons for consistent styling.
char-dropcap
Makes selected text dropcap. This is generally applied only to a single character at the start of a chapter. Use this style rather than the Open Office Writer font properties for consistent styling.
char-italic
Makes selected text italic. Use this style rather than the Open Office Writer italic button for consistent styling.
char-large
Makes selected text about 20% larger. Use this style rather than the Open Office Writer font-size properties for consistent styling.
char-raisedcap
Makes selected text raised cap. This is generally applied only to a single character at the start of a chapter. Use this style rather than the Open Office Writer font-size properties for consistent styling.
char-small
Makes selected text about 20% smaller. Use this style rather than the Open Office Writer font-size properties for consistent styling.
char-smallcaps
Applies a Small-caps style to the selected text. Use this style rather than the Open Office Writer font-size properties for consistent styling.
Caution. As at document date Adobe Digital Editions does not support the CSS font-variant: small-caps; style. Therefore you will not see this style in ADE unless you modify the stylesheet statement to synthesize small caps by transforming and sizing the text.
char-subscript
Makes selected text about 20% smaller. Use this style rather than the Open Office Writer font-size properties for consistent styling.
char-superscript
Makes selected text about 20% smaller. Use this style rather than the Open Office Writer font-size properties for consistent styling.
char-title-num-label
When applied to a number label inside a title-num paragraph, it preserves the content from number processing.